Please use the following addresses for your local network’s TCP/IP (Transmission Control Protocol/Internet Protocol) dns configuration:
Preferred 216.251.142.142
Alternate 74.50.239.1
Use these addresses when registering domains to our authoritative AnyCast DNS servers. Skyway West acts as a hidden master of your domain behind CIRA’s international network of DNS servers intended to mitigate a DDoS attack against your domain.
Primary ns1.d-zone.ca
Secondary ns2.d-zone.ca
ADDING OR CHANGING YOUR DNS SETTINGS
This section will help you add or change your dns settings if using the following operating systems:
Windows 9 X
Windows NT/2000
MAC OS 8.0 and up
After adding or changing your dns settings you should reboot your computer. Be sure to save your work before proceeding.
Windows 9x
-
- Open “My Computer” from your desktop.
- Open “Control Panel” from within My Computer.
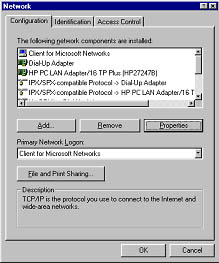
- Find the Icon called “Network” in Control Panel and open it.
Your window will look like this:
-
- In Network, under Configuration, find TCP/IP – Your Network Card and double click to open it.
- Select the “DNS Config” tab at the top of the window.
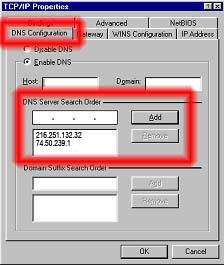
- Locate the “Domain Search Order” box at the centre of this window.
- Highlight the IP addresses currently in the box and press the remove button to the right. You may have to repeat this action if there is more than one IP showing.
Note: Do not remove any internal DNS IP’s. Remove settings like:
209.17.143.10
209.17.177.1
216.251.128.1
216.251.128.2
216.251.132.32 - Now type the following IP address into the box next to the “Add” button:
216.251.142.142
Press, “Add” - Repeat Step 7 using the IP:
74.50.239.1
Press “Add”. - Press “OK”
- Press “OK” on the next screen.
Windows will want to reboot.
Select “Yes”.
When Windows resumes you are done and ready to continue accessing the Internet.
Windows NT/2000
Note: If you have trouble working with the Internet settings in Windows NT/2000 you should contact your system Administrator to assist you.
-
- Right click on Network Neighbourhood (My Network Places in Windows 2000), and select Properties.
Your window will look like this:
- Right click on Network Neighbourhood (My Network Places in Windows 2000), and select Properties.
-
- Under Configuration find TCP/IP – Your Ethernet Card. Double click to open.
- Locate the DNS tab at the top of the window and click on it to select it.
- Remove the old IP settings from the list
Note: Do not remove any internal DNS IP’s. Remove settings like:
209.17.143.10
209.17.177.1
216.251.128.1
216.251.128.2
216.251.132.32 - Add the following two new DNS IP addresses:
216.251.142.142
74.50.239.1 - Press OK on each screen back until you reach the desktop.
You are now ready to continue using the Internet.
Mac OS
Note: These instructions will work with most Macs using OS 8.0 and higher.
Please consult your System Administrator for assistance if you have difficulties.
- Click on the Apple Menu.
- Scroll down to Control Panels.
- Scroll and release mouse on TCP/IP or depending on your OS click TCP/IP.
- The TCP/IP server box will open.
You may have to press a “More” button (located near the bottom), before this information is shown to you. - Remove the old name server IP’s located in this box. Do not remove internal DNS IP’s. Remove settings like:
209.17.143.10
209.17.177.1
216.251.128.1
216.251.128.2
216.251.132.32 - Add the following two new DNS IP’s:
216.251.142.142
74.50.239.1 - Press “Done” when you have finished if your OS prompts you to or close the window.
You are ready to continue using the Internet.
